

A cracked, warped, or pulling gasket on a commercial refrigerator door is not a minor inconvenience; it’s a compounding cost. Every hour that door seal fails to close properly, warm, humid air pushes into the cabinet, the compressor works harder, and the temperature inside creeps toward the range where a health inspector starts writing citations. Kitchen operators who have been through this cycle know the frustration. You order a replacement, wait for delivery, install it, and watch the same problem resurface six months later because it was the wrong one of the two refrigerator gasket types, undersized, or simply cheap.
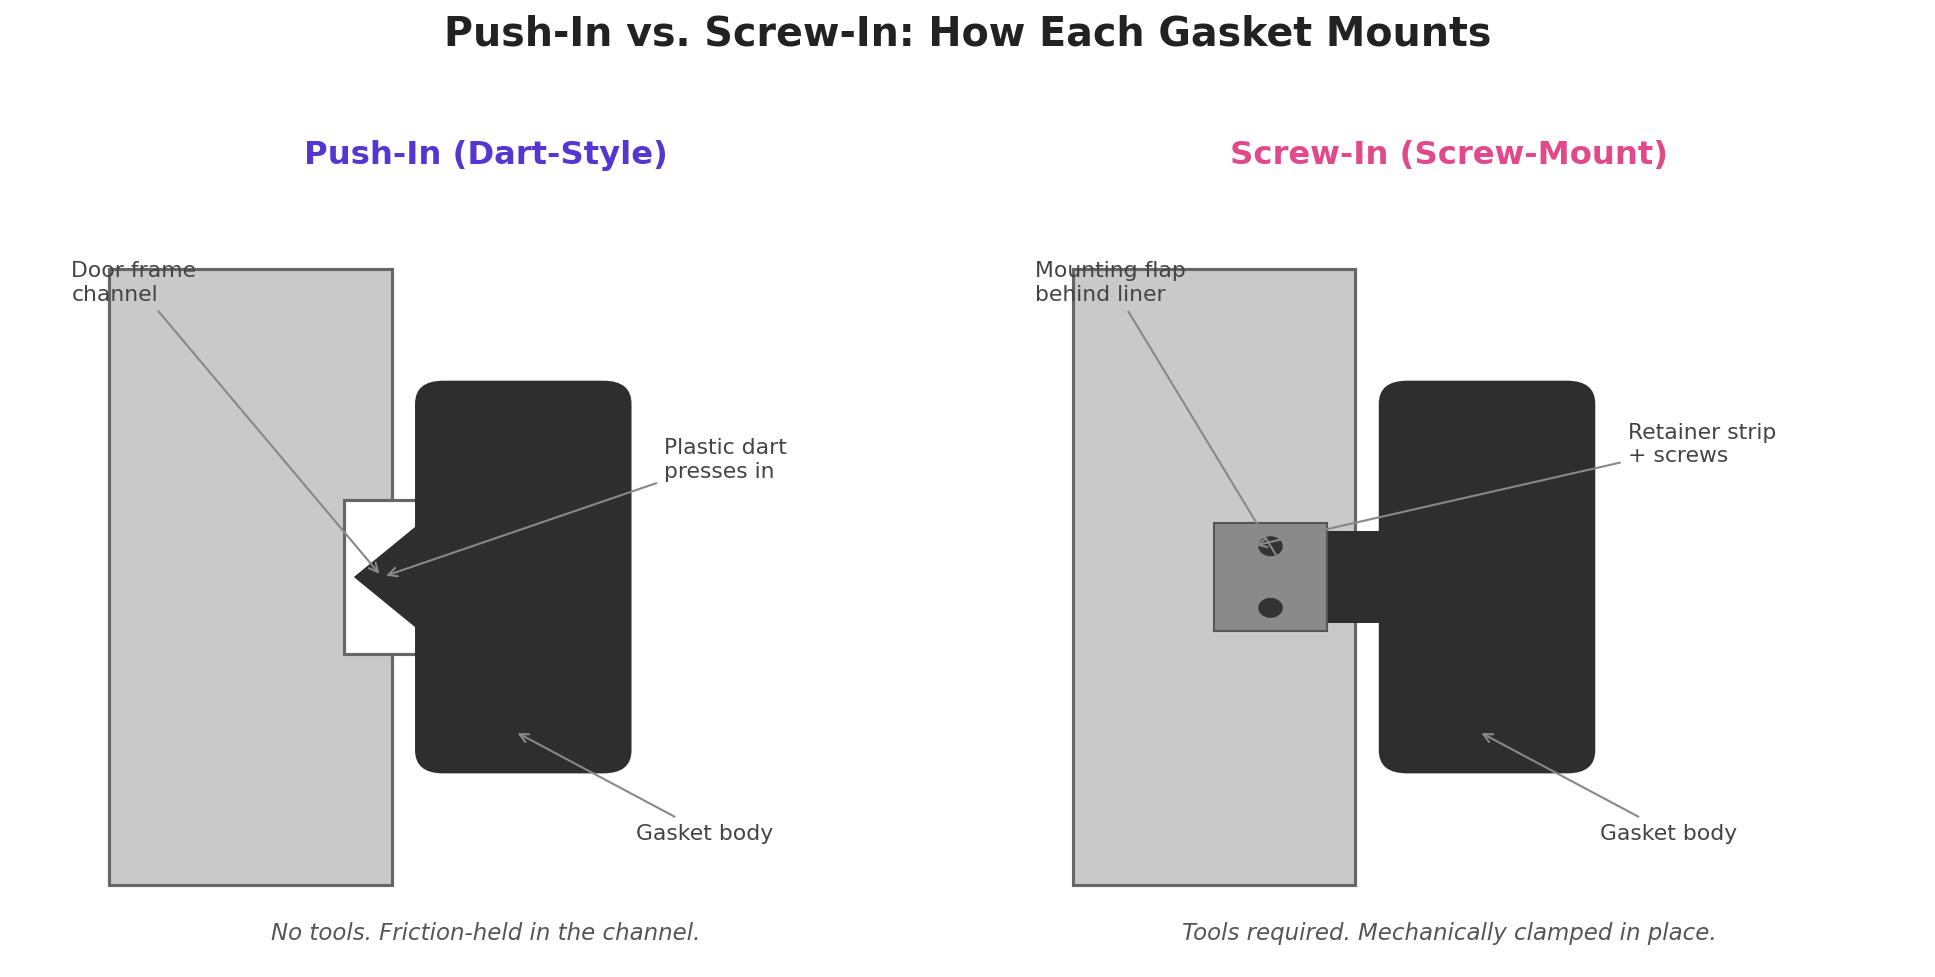
Most of the ambiguity around gasket replacement starts at the mounting style. There are two primary ways a gasket attaches to a refrigerator door: the push-in (dart-style) method, where an arrow-shaped plastic dart presses directly into a grooved channel on the door frame, and the screw-in (screw-mount) method, where a flat mounting flap is secured behind the door liner with a series of metal screws. Getting the mounting style wrong means the gasket will never seat correctly, regardless of how carefully it was measured: a seal that can’t seat flush creates the same temperature leak as a seal that’s visibly torn. The full range of profiles and mounting configurations across commercial equipment brands is covered in our commercial refrigeration gaskets resource, which is worth reviewing before you order a replacement.
Refrigerator Gasket Types: Push-In vs. Screw-In Explained
The mechanical distinction between these two mounting styles is simple, but the downstream consequences of mixing them up are severe. Details matter. Push-in gaskets, also called dart-style gaskets, feature a rigid plastic arrow or fin on the back of the gasket body that presses into a pre-formed groove running along the perimeter of the door frame. No tools required; the dart locks into the channel through friction and compression. Screw-in gaskets work differently at every structural level: a flat mounting flap extends from the back of the gasket and slides behind the door’s inner plastic liner, where it is then clamped in place with screws driven through a retainer strip.
Neither style is inherently advantageous across all applications, but each has a distinct operational profile. Push-in gaskets are faster to swap out: a technician can pull the old dart from the channel and press a new one in within minutes. Screw-in gaskets require loosening and re-tightening the retainer screws, which adds time but delivers a more mechanically anchored hold. In high-traffic kitchens where doors are opened and closed hundreds of times per shift, that anchored stability can matter. The point that trips up most buyers is that the mounting style is determined by the door’s construction, not by preference. Installing a push-in gasket on a door designed for screw-mount hardware, or vice versa, prevents an airtight seal, leaving the door vulnerable to the same temperature leaks you were trying to fix.
A properly sealed door is central to controlling refrigeration energy costs, per Energy.gov FEMP purchasing guidance for commercial refrigerators and freezers. That’s a measurable operational cost that compounds daily, not a theoretical concern. Beyond the mounting style, the material and profile shape of the gasket body also affect long-term seal quality, which is a separate consideration from which of the two mounting types your door requires.
Understanding Push-In (Dart-Style) Gaskets
The push-in gasket gets its name from the installation method: a rigid plastic dart or fin, molded into the back of the gasket body, presses directly into a grooved channel running along the inner edge of the door frame. When the dart is fully seated, the gasket body compresses against the cabinet face and creates a seal. No screws, no retainer strips, no tools. Just firm, even pressure applied around the perimeter of the door. It works.
That simplicity is genuinely beneficial in a commercial setting where downtime costs money. A maintenance tech who keeps a replacement gasket on hand can swap a push-in style in under ten minutes without pulling the door off its hinges or hunting for a nut driver. The trade-off is that the dart relies entirely on friction to stay in the groove. In kitchens where gaskets get snagged by carts, pulled during aggressive cleaning, or dried out and brittle from heat exposure, a dart-style gasket can work its way out of the channel, sometimes partially, sometimes completely, without any obvious external damage to the gasket body itself. One of the clearest early indicators of a working seal versus a failing one is frost accumulation on shelves and stored products: a signal that warm, moist air has been infiltrating the cabinet long enough to freeze on contact with cold surfaces.
- Pros: Fast installation with no tools required; the clean finished look leaves no visible hardware on the door face; simple to replace in-house with the correct profile on hand.
- Cons: Relies entirely on friction to hold position; can pull out of the groove if snagged or if the dart becomes brittle over time; profile dimensions must match the channel exactly, or the dart won’t seat properly.
- Identification: Run your fingers along the inner edge of the door frame. A push-in door has a continuous grooved channel, typically a narrow slot or U-shaped track, with no screws or retainer hardware visible along the liner.
Understanding Screw-In (Screw-Mount) Gaskets
The screw-in gasket mounts differently at every structural level. It is mechanical. Instead of a dart that presses into a groove, the gasket has a flat flap extending from its back face. That flap slides behind the door’s inner plastic liner, and a retainer strip, metal or plastic depending on the equipment, is then screwed down over it, clamping the gasket firmly in place. The screws run along the perimeter of the door liner, typically spaced every few inches, and the entire assembly creates a gasket that is mechanically locked rather than friction-held.
This mounting method is prevalent on older commercial refrigeration equipment and on heavy-duty units designed for demanding environments. For anyone managing commercial refrigerator gasket replacement on a fleet of aging reach-in units or walk-in coolers, screw-mount hardware is a familiar sight. The installation takes longer than a push-in swap. You will need a screwdriver or nut driver, and stripping a screw on an aging retainer strip is a real risk if the hardware hasn’t been touched in years. The payoff is a gasket that won’t pull loose under the mechanical stress of a high-volume service.
The energy stakes around any failing gasket are significant. Restaurants use more electricity for refrigeration than for any other single system, per ENERGY STAR for Small Business, which makes a leaky door one of the most direct ways that energy gets wasted. A screw-mount gasket that has been correctly installed and torqued down eliminates that leak point more reliably than a friction-held dart in a worn or widened channel. This is why screw-in hardware tends to be the default on equipment built for sustained, heavy use.
- Pros: Mechanically secured and won’t pull out under heavy traffic or aggressive door use; highly durable in demanding commercial environments; retainer strip distributes clamping force evenly around the door perimeter.
- Cons: Slower to install and replace than push-in; requires tools; risk of stripping screws on older retainer hardware; door liner must be partially disassembled to access the mounting flap.
- Identification: Look for a row of screws running along the inner door liner, typically covered by or adjacent to a narrow retainer strip. Visible hardware along the liner edge means screw-mount.
“Our material is a significantly higher quality than OEM, ensuring that the gaskets wear longer and perform better than OEM,” says Dale Force, Sales Director for Gaskets Rock International.
Push-In vs. Screw-In: How to Choose the Right Seal
The choice between push-in and screw-in gaskets is largely made for you by whoever manufactured your refrigerator door. The door’s construction, specifically whether it has a grooved dart channel or a liner with a retainer strip, determines which mounting style will work. Switching from one to the other typically requires replacing the entire door assembly, not just the gasket. That is expensive. A surprisingly common misstep is ordering a replacement based on outer dimensions alone, assuming that if the measurements match, the part will fit. Outer dimensions tell you the gasket will cover the right area; the profile tells you whether it will attach and seal.
Matching Refrigerator Gasket Types to Your Equipment
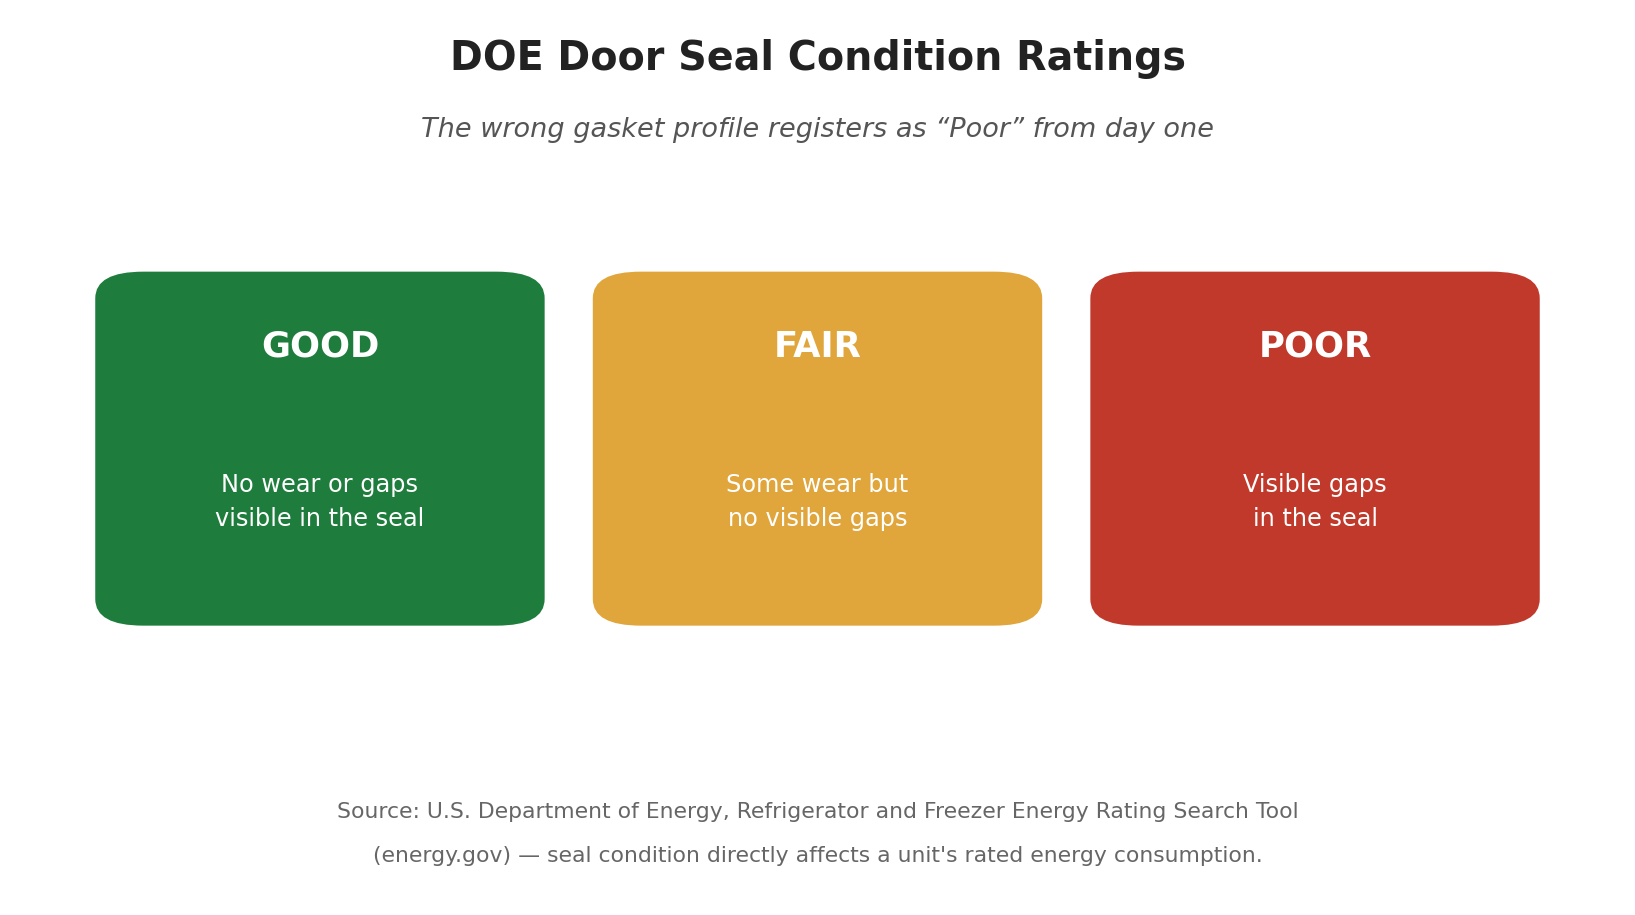
Profile matching matters because even a gasket with the correct outer dimensions will fail to create a proper seal if the dart is the wrong width for the channel, or if the mounting flap is too thick for the retainer strip. The U.S. Department of Energy’s refrigerator and freezer rating tool classifies door seals into three condition categories: Good (no visible wear or gaps), Fair (some wear but no visible gaps), and Poor (visible gaps in the seal). A gasket installed with the wrong profile registers as Poor from day one, regardless of how new it is. That classification carries real consequences for energy audits and health inspections.
When you’re unsure which profile your equipment uses, especially on older units where the door tag has faded or been painted over, the physical inspection described in the FAQ section below will get you to the right answer without needing a model number. If you’d rather have a technician handle the identification and sourcing, Gaskets Rock can match the correct profile to your equipment directly. Reach the team at (800) 790-9284, Monday through Friday, 8:00 AM to 6:00 PM.
How to Replace Your Refrigerator Gasket
Replacing your gaskets is a direct, manageable process once you have the correct profile in hand. The tools and sequence differ slightly between the two, but neither job requires specialized equipment or significant downtime.
- Tools needed: Flathead or Phillips screwdriver (screw-in only), a nut driver if the retainer uses hex-head fasteners, a mild cleaning solution and microfiber cloth, and a hair dryer or bucket of warm water to relax the new gasket before installation.
- Clean first: Wipe down the channel or liner area thoroughly before removing the old gasket. Grease and debris in the mounting area will prevent the new gasket from seating correctly.
- Remove the old gasket: For push-in, grip the gasket body and pull the dart out of the channel, working around the perimeter. For screw-in, loosen the retainer screws. Don’t remove them fully until the flap is ready to slide out; then work the old flap free from behind the liner.
- Warm the new gasket: A cold gasket is stiff and prone to creasing during installation. Run it through warm water or use a hair dryer on low heat for a few minutes to make it pliable before pressing or sliding it into position.
- Install and check: Press the dart into the channel (push-in) or slide the flap behind the liner and tighten the retainer screws evenly (screw-in). Once installed, close the door and run your hand along the perimeter: any cold air escaping indicates a gap that needs to be reseated.
Temperature compliance is the non-negotiable outcome of a properly installed gasket. Per FDA food safety guidelines, refrigerators must maintain a temperature at or below 40°F (4°C) and freezers at or below 0°F (-18°C). A gasket that fails to seal the door, whether from the wrong profile, a pulled dart, or a stripped retainer screw, puts those thresholds at risk and creates direct food safety liability that no operator wants to explain to an inspector.
Not every kitchen has the bandwidth to handle identification and sourcing in-house, and that’s a legitimate operational reality. Sean Kobos, a Pittsburgh-area restaurant owner, described his experience: “I was recommended this company by a friend and fellow restaurant owner in Pittsburgh, PA. With one phone call, they had their local division come to my restaurant. I didn’t have to find any make or model numbers. They did it all. Great product; I highly recommend them.”
A few specific questions come up repeatedly when kitchen operators are working through gasket selection and replacement, and they’re worth addressing directly.
Frequently Asked Questions About Refrigerator Gaskets
How often should commercial refrigerator gaskets be replaced? ▸
There’s no single answer that applies across all equipment and environments. A gasket on a low-traffic prep refrigerator in a small café will outlast the same gasket on a reach-in at a high-volume burger operation by a wide margin. Cleaning habits matter too: harsh degreasers and abrasive scrubbing accelerate vinyl degradation faster than standard wiping down with a food-safe cleaner. Any gasket showing cracks, tears, brittleness, or visible gaps should be replaced immediately regardless of age.
How do I identify my refrigerator door gasket type if the model tag is missing or unreadable? ▸
Physical inspection is fail-safe even without a model number. Open the door and examine the inner edge of the door frame. A continuous grooved channel or slot running around the perimeter with no visible screws or hardware means push-in (dart-style). A row of screws along the inner door liner, often covered by or adjacent to a narrow retainer strip, means screw-in (screw-mount). In most cases, you can confirm the type within thirty seconds of opening the door.
What is magnetic door gasket installation, and does it apply to both push-in and screw-in types? ▸
Yes, magnetic strips are a feature of the gasket body itself, not the mounting style. Both push-in and screw-in gaskets can contain a magnetic strip embedded inside the vinyl pocket that runs along the door-facing side of the gasket. When the door closes, that magnetic strip pulls the gasket flush against the metal cabinet frame, creating a tighter seal than compression alone would provide. The mounting style, dart versus screw flap, determines how the gasket attaches to the door; the magnetic strip determines how the door face seals against the cabinet.
What are the best refrigerator gaskets for heavy-traffic commercial kitchens? ▸
Gaskets made from high-quality, heat-, grease-, and mold-resistant materials that outlast factory OEM parts are the practical answer for high-volume operations. The difference in longevity between a well-sourced aftermarket gasket and a standard OEM replacement becomes obvious quickly in demanding environments. Craig Ledger, who manages an extremely high-volume restaurant, described the gap directly: “We are an EXTREMELY high-volume restaurant… our gaskets used to wear out every 2 months! With Gaskets Rock, our commercial refrigeration gaskets last much longer and, in many cases, over a year! The Gaskets Rock staff do just that, ROCK!”
What are the different types of door seals used in commercial refrigeration? ▸
Commercial refrigeration door seals fall into three primary mounting categories. Dart-style (push-in) gaskets use an arrow-shaped fin that presses into a channel groove, which is common on newer reach-in units and many residential refrigerators. Screw-mount gaskets use a flat flap secured behind the door liner with a retainer strip and screws. These are prevalent on older commercial equipment and heavy-duty walk-in cooler doors. Press-fit profiles, a variation of the push-in design, use a slightly different fin geometry suited to specific door frame tolerances on certain commercial brands. Within all three categories, gaskets may or may not include an embedded magnetic strip depending on the equipment design and manufacturer specifications.
Tight door seals are among the most cost-effective maintenance investments a commercial kitchen can make. The compressor doesn’t care whether the gap in your gasket came from a pulled dart or a stripped retainer screw: it runs harder and longer to compensate either way, and the utility bill reflects it. Replacing a failed gasket with the correct profile and a material that can handle the heat, grease, and mold of a real working kitchen is a direct fix that pays for itself in reduced energy draw and avoided food safety violations.
Contact Us Today
At Gaskets Rock International, we build the toughest gaskets on the planet, made to outlast OEM by a mile. This is a performance difference that kitchen operators notice within the first replacement cycle, not just on a spec sheet.
John Dollar, who has spent more than three decades in food service, described the difference plainly: “I really appreciate Gaskets Rock and especially Ted Stepp, out of KY and WV. We’ve been partnered together for over a year with my Sonic Drive-In market. Their product: these are the strongest, easiest to clean, and longest-lasting gaskets I’ve seen in my 30+ years in Food Service.”
Michael Golder, who has worked with the Gaskets Rock team across multiple routine and emergency service visits, added: “I have had phenomenal, above-and-beyond service from Gaskets Rock and Ken Davis for the past 10 months. We’ve had multiple routine visits from them, as well as some service calls, and the level of professionalism, transparency in work, and even kindness has always shown through. Ken, in particular, has been quick to respond to all questions and has always made us feel like a valued partnership.”
If you’re ready to stop wasting time on cheap fixes, request a free commercial gasket quote and let the team identify the correct profile and material for your specific equipment, or reach out to our team with any questions first. Anna Interiano, who manages a restaurant in the Virginia area, noted: “Awesome that this place comes to you and gives you a free quote. Joe in the Virginia area is very responsive and informative about how the process works. He is also very flexible with the times and days that he is able to visit restaurants. Quality gaskets and service!”
Reach Gaskets Rock at (800) 790-9284, Monday through Friday, 8:00 AM to 6:00 PM. Our national divisions across the United States, Canada, and México are ready to help, in addition to our home base in Pittsburgh.