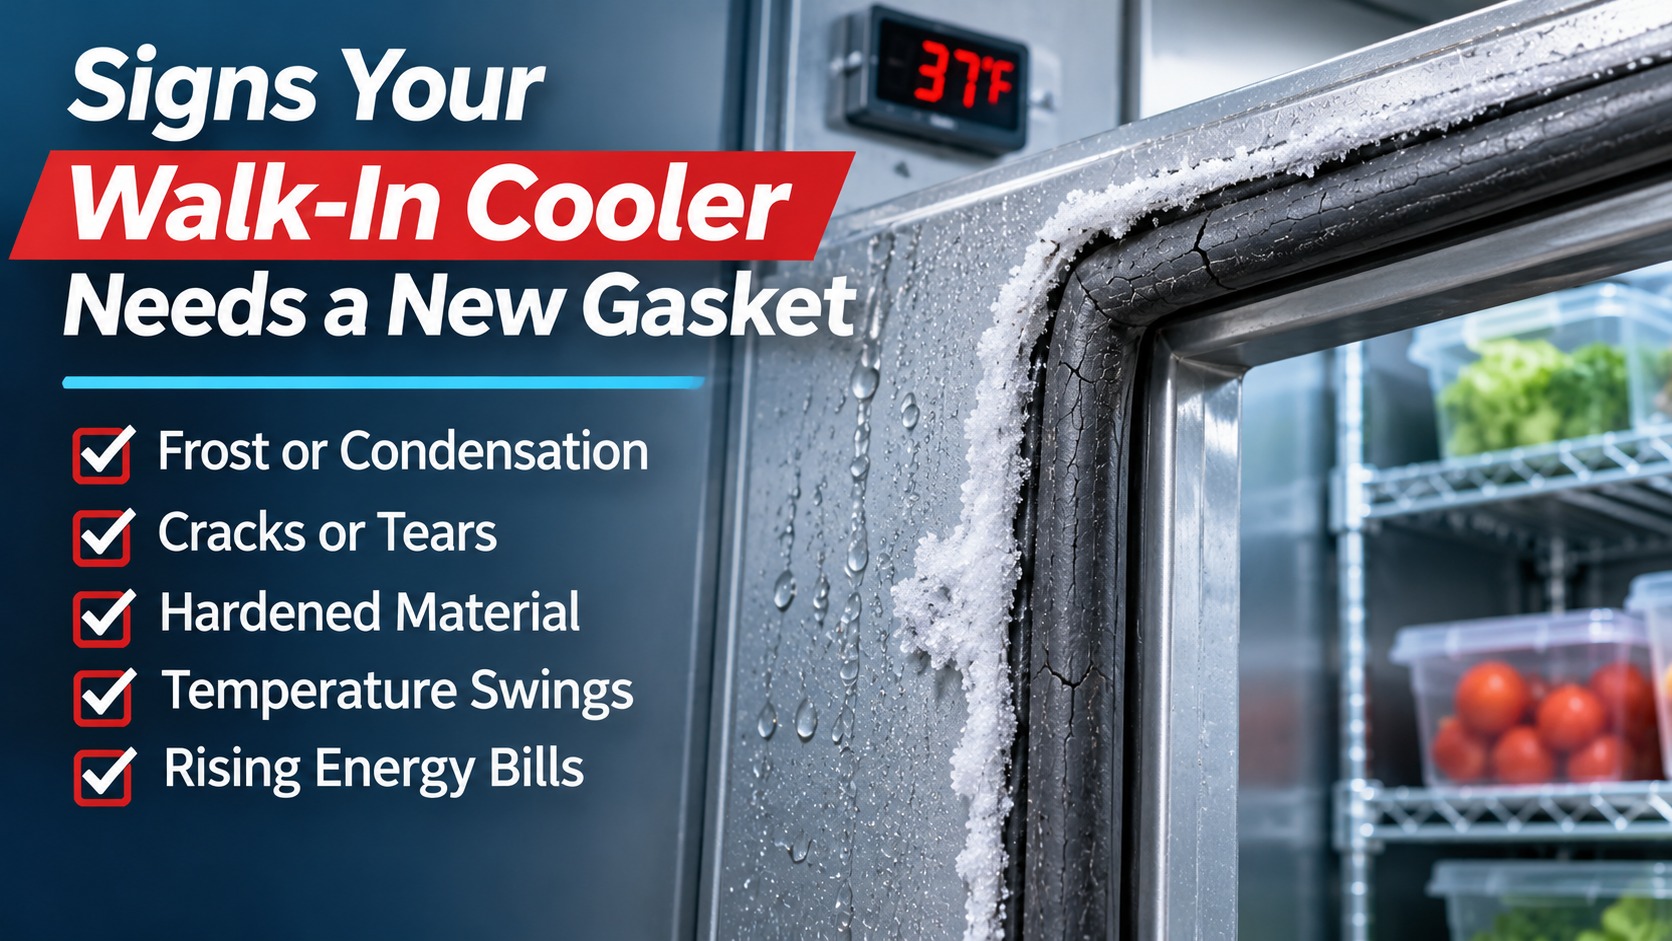
A failing door seal rarely announces itself. The signs your walk-in cooler needs a new gasket tend to creep in slowly: a little frost along the frame, a thermometer that reads a degree or two high, a utility bill that climbs without explanation. By the time the compressor runs most of the day, product is already sitting in a warmer box than it should be. Spotting the early signals turns an unplanned service call into a simple seal swap.
The gasket is the flexible seal that runs around the edge of the door and closes the gap between the door and the frame. Its job is to keep cold air in and warm, humid kitchen air out. Operators who work with Gaskets Rock learn to treat that strip of vinyl or rubber as a core part of the cooling system, because everything behind it has to work harder the moment it stops sealing.
What a Walk-In Cooler Gasket Actually Does
Cold storage is a balancing act. The refrigeration system removes heat, and the door seal stops new heat from creeping back in. A healthy gasket compresses evenly against the frame and leaves no gap for humid air to slip through. Once it hardens, tears, or loses its grip, warm air flows in, moisture follows it, and the evaporator and compressor have to run longer to catch up.
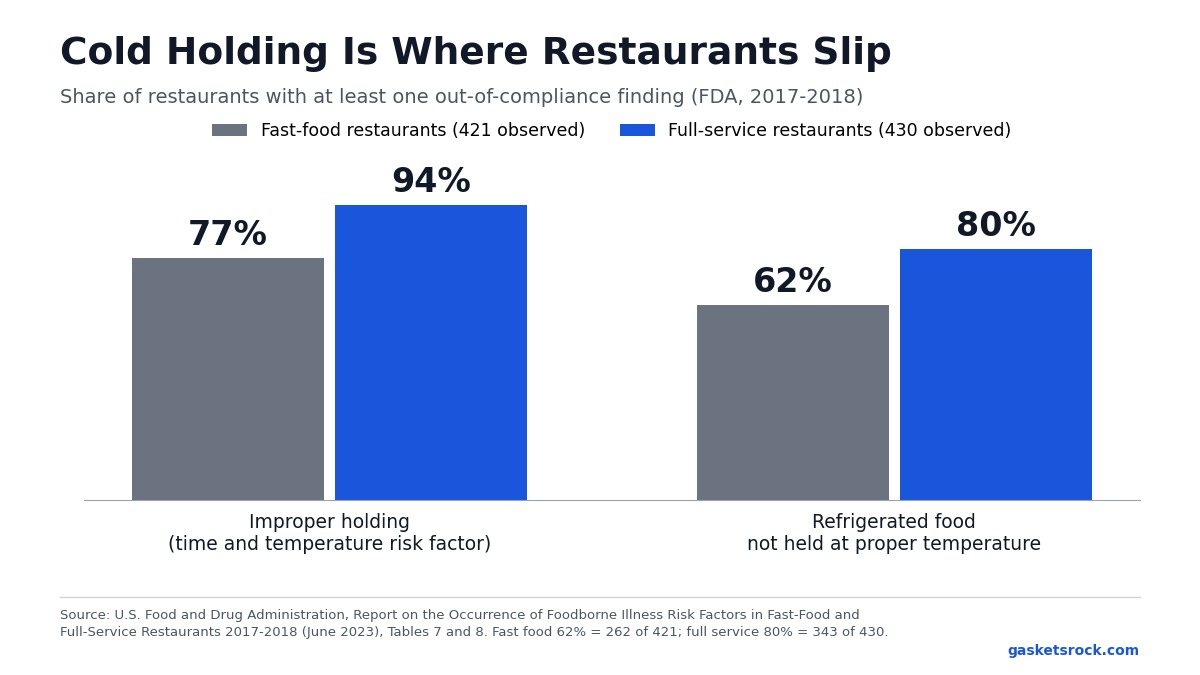
That matters for far more than electricity. The FDA calls for time/temperature control for safety foods to be held refrigerated at or below 41°F (5°C), and in its 2017-2018 study of restaurants, cold holding of foods requiring refrigeration ranked among the three food safety practices most in need of improvement. In that same study, FDA observers found at least one refrigerated-food temperature problem in 80% of the full-service restaurants and 62% of the fast-food restaurants they visited. A seal that lets the box drift warm makes that job harder on every shift.
Nine Signs Your Walk-In Cooler Needs a New Gasket
Some warnings show up on the seal itself. Others show up in your temperature log or on your utility statement. Use this quick reference to match what you notice to how urgently it needs attention.
| Warning Sign | What You Will Notice | How Urgent |
|---|---|---|
| Cracks or tears | Splits, gaps, or missing chunks along the seal | Replace soon |
| Hardened material | Stiff, brittle, or permanently flattened sections | Replace soon |
| Frost or condensation | Ice or moisture along the frame, door edge, or floor | Inspect now |
| Mold or mildew | Dark specks or slime in the folds of the seal | Clean, then replace |
| Door will not close cleanly | Door drifts open, bounces back, or needs a shove | Inspect now |
| Temperature swings | Thermometer readings that drift or spike between deliveries | Inspect now |
| Rising energy bills | Higher usage with no change in menu or volume | Investigate |
| Dollar bill slides out | The bill pulls free with little resistance | Replace soon |
| Hissing or drafts | A faint whistle or cool air along the door edge | Replace soon |
Visible Cracks, Splits, or Tears
Run your fingers along the full loop of the seal, including the corners and the bottom edge where carts and mop buckets do the most damage. Any crack, split, or missing piece creates a direct path for air to move between the cooler and the kitchen. Damage like this usually comes from age, impact, or repeated cleaning with harsh chemicals.
Small tears matter more than they look. Every time the door closes, the seal flexes at that weak point, and a hairline split can grow into a gap within weeks. Waiting means paying for the leak the whole time.
Hardened, Brittle, or Flattened Material
A healthy gasket feels soft, springy, and slightly cushioned. Press your thumb into it and it should rebound. Years of temperature cycling and cleaning agents slowly cure the material until it turns stiff, and a stiff seal cannot conform to the frame the way it needs to.
Pay attention to sections that stay creased or flattened after the door opens. Those spots have lost their memory, which means they no longer push back against the frame and the door closes with a gap behind it.
Frost, Ice, or Condensation Around the Door
Warm, moist air that leaks past a bad seal meets cold surfaces and turns into moisture or frost. You might see a ring of ice around the frame, a slick patch on the floor under the door, or beads of water along the gasket. Left alone, that buildup makes the door harder to open, can damage the frame, and keeps the refrigeration system working overtime.
If you scrape the frost away and it returns within days, the leak is active. Walk-in freezers show this sign faster and more dramatically, which is why gasket service for walk-in freezers often starts with a frosted doorway.
Mold or Mildew on the Seal
The folds of a gasket trap moisture, and moisture invites mold. Dark specks, pink film, or black staining along the seal are clear signals that humidity is collecting where it should not. Because this sits right at the door of a room full of food, it is a food safety concern as well as a maintenance one.
Mold also breaks down the gasket material, which creates new weak spots. Wiping the seal with mild soap and warm water is the right first step, but if the growth keeps coming back, the failing seal is the root cause and cleaning will only buy a few days.
A Door That Will Not Close or Latch Cleanly
A distorted gasket can physically block the door from lining up with the latch. On magnetic gaskets, the magnet can weaken over time and stop pulling the door snug in the last inch of travel. Either way, staff end up shoving the door, and a door that pops back open leaves the box unsealed until someone notices.
Before blaming the seal alone, check for worn hinges and loose handles. A sagging door pulls the gasket out of alignment, and a new seal will not hold up for long on a door that no longer hangs square.
Temperature Swings Inside the Cooler
A walk-in should hold a steady temperature around the clock. If the thermometer drifts upward between deliveries, or the compressor seems to cycle more often than it used to, warm air is getting in somewhere, and the door seal is the most common entry point.
Keep a simple daily log. A steady upward creep over several days points to a leak, while a spike right after a delivery is usually just door traffic. Swings put perishable inventory at risk and add wear to the compressor and other costly components.
Higher Energy Bills Without a Clear Cause
Refrigeration is one of the biggest electrical loads in a commercial kitchen. When the seal leaks, the compressor runs longer to replace the cold that escapes, and that shows up on the bill. Compare this month against the same month last year, and if usage rose while your volume stayed flat, start with the door.
Strip curtains at the doorway help reduce air exchange while the door is open, but they cannot make up for a leaking seal when the door is closed.

The Dollar Bill Test Fails
This is the simplest check in the kitchen and it takes about two minutes. It gives you proof of a gap rather than a hunch.
- Open the door and place a dollar bill across the gasket so half of it sits against the frame.
- Close the door fully and latch it.
- Tug the bill straight out. A good seal grips it firmly.
- Repeat every foot or so around the whole perimeter, covering the hinge side, latch side, top, bottom, and all four corners.
If the bill slides out easily at any point, the seal has a gap there. One failed spot is enough to justify a closer look at the whole gasket.
Audible Air Leaks or Cool Drafts
With the fans running and the door closed, stand outside and listen along the edges. A faint hiss or whistle means air is being forced through a small opening. You can also pass the back of your hand slowly around the door edge and feel for a thin stream of cool air.
The sound is strongest when the pressure difference between the box and the kitchen is greatest, such as on a hot afternoon. Not every failing seal makes noise, but if yours does, treat it as urgent.
How to Check Your Gasket in Five Minutes
A Simple Walkthrough for Spotting the Signs Your Walk-In Cooler Needs a New Gasket
You do not need tools to run a reliable inspection. Work through these steps with the door open, then closed.
- Look: Follow the whole loop of the gasket for cracks, discoloration, mold, or pulled-away sections, paying extra attention to the corners.
- Touch: Press along the seal. It should feel soft and rebound quickly, not hard or sticky.
- Test: Run the dollar bill test at several points around the door.
- Inspect the frame: Check for frost, moisture, rust, or staining that points to a leak.
- Review your records: Compare recent temperature readings and energy usage against your normal range.
- Listen: Close the door and check the edges for hissing or drafts.
Healthy Gasket Versus Failing Gasket
| Check | Healthy Gasket | Failing Gasket |
|---|---|---|
| Feel | Soft, springy, rebounds when pressed | Stiff, sticky, or permanently creased |
| Look | Smooth, even color, intact corners | Cracked, discolored, or pulling away |
| Dollar bill | Gripped firmly at every point | Slides out at one or more spots |
| Door action | Closes with a light push and stays shut | Bounces back or needs a shove |
| Frame | Dry and clear | Frost, moisture, or mold nearby |
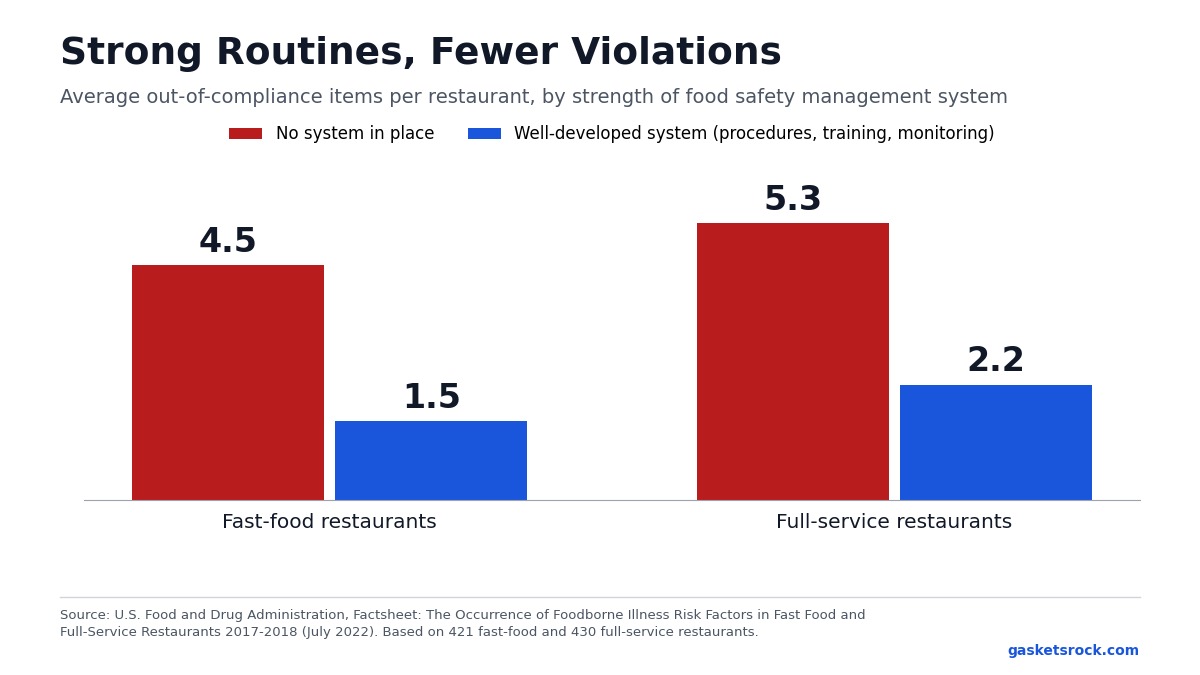
Make the walkthrough a monthly habit and repeat it any time something strikes the door. The FDA’s restaurant study points the same direction: operations with well-developed procedures, training, and routine monitoring averaged less than half as many food safety violations as those with no system at all. A regular seal check is exactly that kind of monitoring.
What a Failing Seal Puts at Risk
Food Safety and Inspection Exposure
Foodborne illness is common and costly. The CDC estimates that roughly 1 in 6 Americans gets sick from it every year, and the FDA notes that restaurants are a frequent setting for outbreaks. Holding cold food cold is one of the simplest controls a kitchen has, and it depends on a box that can actually hold temperature.

A seal that lets the cooler warm up also invites mold, condensation, and temperature records that are hard to explain to an inspector. Fixing the gasket protects the product and the paperwork at the same time.
Equipment Strain and Repair Costs
A leaking door forces the compressor to run longer and puts extra load on the evaporator, which collects ice faster when humid air keeps coming in. Over time that means more wear on parts that cost far more than a seal. Catching the leak early, ideally with on-site gasket service for commercial refrigeration, keeps a small fix from becoming a compressor call.
Energy Waste You Pay for Every Month
Unlike a broken compressor, a leaky gasket never stops the kitchen, so it can run for months without anyone noticing. The cost arrives as a slow increase on the utility bill. Replacing the seal is a one-time expense that ends the waste.
Repair, Adjust, or Replace: Making the Call
When Cleaning or Adjusting Is Enough
If the gasket is soft, intact, and only dirty, a cleaning may be all it needs. Wipe it with mild soap and warm water, dry it, and recheck the seal. A section that has popped out of its channel can often be pressed back in, and a door that is slightly out of square may only need its hinges tightened.
Avoid harsh chemicals and abrasive pads, which dry out the material and shorten its life. If you clean, adjust, and still see frost or fail the dollar bill test, the gasket has moved past maintenance.
When Replacement Is the Right Call
Cracks, hardened material, a weak magnet, returning mold, and repeated bill test failures all point to replacement. The material does not recover once it has aged out, and every week of delay adds energy cost and food safety exposure. Professional door seal replacement for walk-in coolers matches the original profile and checks the door alignment so the new seal compresses evenly.
The same logic applies across the kitchen. If your reach-in, prep table, or under-counter units show the same warning signs, replacement gaskets for those units are available too, and it often makes sense to handle them in one visit.
What to Have Ready Before You Call
- The make and model of the walk-in, usually printed on the door tag or data plate
- The number of doors affected and their approximate dimensions
- A clear photo of the damaged section and the gasket profile
- Notes on frost, temperature swings, or energy changes you have noticed
Gaskets exist for most major equipment makers, and you can see the brands we service to confirm yours is covered.
Making a New Gasket Last Longer
A fresh seal is a good time to build a few habits that stretch its life:
- Wipe the gasket monthly with mild soap and warm water, and dry the channel
- Keep carts, dollies, and mop buckets from striking the lower edge of the door
- Tighten loose hinges and handles as soon as you notice movement
- Use door sweeps and self-closing hardware so the door seats fully every time
- Log temperatures daily so drift shows up early
For kitchens that would rather not track it themselves, a recurring gasket inspection program puts a technician on the schedule so wear is caught before it turns into frost, spoilage, or a surprise bill.
Frequently Asked Questions
Spotting Problems
How do I know if my walk-in cooler gasket is bad? ▸
Look for cracks, tears, stiffness, mold, and frost along the door frame. Then run the dollar bill test at several points around the door. If the bill slides out with little resistance anywhere, the seal is no longer gripping and the gasket needs attention.
What causes frost around a walk-in cooler door? ▸
Frost forms when warm, humid air leaks past the seal and freezes on contact with cold surfaces. A worn gasket is a common cause, but a sagging door, loose hinges, or a door that does not fully latch can create the same gap, so check all three.
Can a bad gasket really raise my energy bill? ▸
Yes. A leaking seal lets warm air into the box, which makes the compressor run longer to hold temperature. If your usage climbs while your menu and volume stay the same, the door seal is one of the first things worth inspecting.
Replacement and Upkeep
How often should I inspect my walk-in cooler gasket? ▸
A monthly walk-around is a practical habit for most kitchens, with an extra check any time a cart strikes the door or you notice frost, moisture, or temperature drift. Busy doors that open constantly deserve closer attention.
Can I replace a walk-in cooler gasket myself? ▸
Some gaskets are simple to swap, but the replacement has to match the original profile, length, and mounting style, and the door has to be aligned for the new seal to compress evenly. A technician can confirm the fit and fix alignment problems at the same visit.
Does a worn gasket affect a health inspection? ▸
It can. Cold foods are expected to be held at or below 41°F (5°C), and a seal that lets the box drift warm works against that. Inspectors look at whether refrigerated food is being held at safe temperatures, so a failing gasket is a risk worth fixing before the next visit.
Get Your Walk-In Sealed Up Right
If your cooler is showing two or three of these signs, there is no reason to wait for the next breakdown. Contact a gasket specialist and describe what you are seeing, and the team can tell you whether a cleaning, an adjustment, or a replacement will solve it.
If you want pricing for the doors that need attention, request a free quote and the team will follow up with next steps.
Gaskets Rock works through local partners across the United States, Canada, and Mexico, so you can find a service partner near your restaurant and get a technician out quickly.
A seal that grips again means a cooler that holds temperature, a compressor that gets some rest, and one less thing to worry about at close.